I finally found the absolute best kitchen sponges… ever!
Honestly, I never thought kitchen sponges mattered all that much to me.
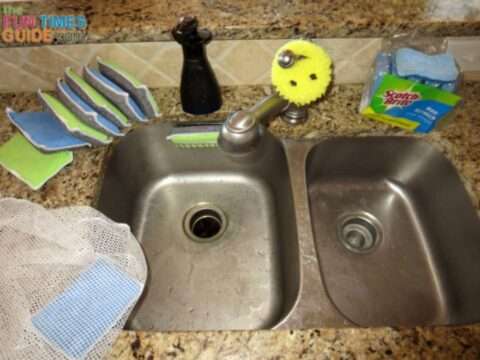
I’ve been using the same brand of sponges for years — until recently.
See why I switched, what I switched to, and what I’ve learned about how to clean a sponge…
Kitchen sponges are the No. 1 source of germs in the whole house. Why? The moist, micro-crevices that make a sponge such an effective cleaning device also make it a cozy home for germs and more difficult to disinfect. Wiping your counters or dishes with a dirty sponge will only transfer the bacteria from one item to another … One single bacteria cell can become more than 8 million cells in less than 24 hours!
~ Source
The Sponges I Use
I used to use the blue Scotch-Brite sponges.
I still like them (especially for kitchen dishes) and I think they’re the best non-scratch sponge that you can easily find in most stores, but they tend to hold in all the smells, food, and grease. This makes them fairly expensive for disposable sponges that don’t last very long.
Each blue Scotch-Brite sponge typically lasted a couple weeks in my kitchen before I needed to throw it out — a month tops, if I took extra steps to disinfect it when it got too grimy.
Now I use microfiber sponges.
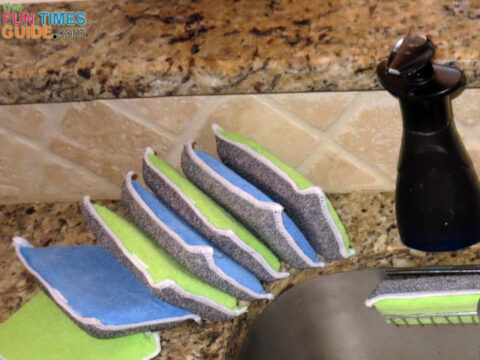
They’re 2-sided, and each side serves a different purpose in the kitchen:
- On one side is a soft cloth-like microfiber material that cannot scratch any item in any way.
- On the other side is a diamond-fiber surface that is abrasive enough to scrub stubborn burnt-on foods without scratching kitchen surfaces — including non-stick surfaces inside of pots & pans, the glass stovetop that typically requires a ‘specialized cleaner’, and everything in between!
My microfiber sponges are also a little bit bigger than the blue Scotch-Brite sponges. I never realized how much I would appreciate that!
Here’s why I like a slightly larger kitchen sponge:
- They fit better in my hand.
- They require fewer swipes to get items clean.
- They still fit inside the same sink-side sponge holder that I’ve always used.
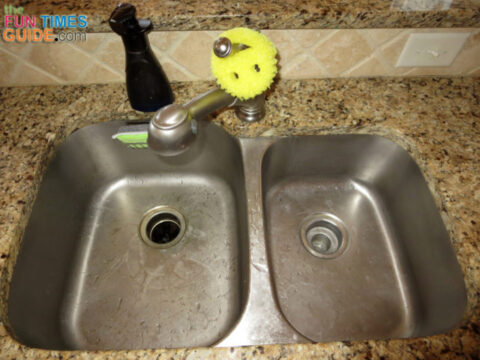
In addition to the microfiber kitchen sponges that I use every day to clean my countertops & appliances — and wash all of my dishes — I also have one super scrubby non-scratching sponge that I keep near my kitchen sink day in and day out.
It’s a Scrub Daddy sponge. (Yes, the one that debuted on Shark Tank… then hit the store shelves in Bed, Bath & Beyond… and now is on QVC.)
Since I use this sponge solely for removing greasy, cooked-on or burnt-on foods, I don’t use it in the one cool way that I thought I would: to clean the inside of cups and glasses. In our house, I need a super strong scrubber much more often than I need something to clean the inside of cups & glasses with.
For what it’s worth, I sometimes use a blue Scotch-Brite sponge as my scrubby sponge for greasy items IF I don’t happen to have another Scrub Daddy sponge on hand when I need it. But truthfully, the Scrub Daddy actually scrubs better and it doesn’t hold in any of the smells, food particles, or stains like a blue Scotch-Brite kitchen sponge does.
Plus, the Scrub Daddy sponge fits nicely over the handle of my kitchen faucet, whereas I’d need to place another sponge holder inside the sink if I regularly used the blue Scotch-Brite sponges for this purpose — because they need a place to dry out in between uses.
How To Make Your Kitchen Sponges Last Longer
Before, when I was using the blue Scotch-Brite kitchen sponges, I would clean and sanitize each one when it started to get grimy after using it for a week or so. Then, after sanitizing, I’d usually get another week or so out of it before I finally had to throw it away.
These days, with my 10-pack supply of fully washable microfiber kitchen sponges, I keep rotating the sponges every week, and I haven’t had to throw one away yet!
Here’s why my kitchen sponges last longer than most peoples’…
- I always hand clean — before I sponge clean — my greasiest, dirtiest pots and pans.
- I set aside one ‘special’ sponge (the Scrub Daddy sponge, mentioned above) for use on all of those greasy, burned on food items — so my everyday kitchen sponges aren’t being used on the most challenging kitchen cleaning tasks.
- I use microfiber reusable sponges for everyday dishwashing and countertop cleaning.
- I don’t use my everyday microfiber sponges to clean things that raw meat has touched,
- I clean my kitchen sponges almost daily — it only takes 2 minutes!
- I always wring most of the water out of a sponge before letting it air-dry.
To save wear & tear on my ‘good’ microfiber sponges, here’s how I clean greasy pots & pans or burnt-on food items:
- Pump a few squirts of Dawn foaming soap into the pan. (By the way, DIY foaming soap is much cheaper than using a liquid dishwashing soap full-strength.)
- Use your hands to rub the soap over all of the greasy, grimy spots in the pan first, then use the Scrub Daddy sponge (if scrubbing is necessary).
- Rinse the pan.
- Repeat Step 2 if necessary, until the pan no longer feels super greasy to the touch.
- Finally, use the microfiber kitchen sponge — and a little more soap — to fully clean the pan.
Wah-lah, the pan is clean and the microfiber kitchen sponge isn’t greasy and packed with grime. Best of all: we haven’t used a ton of soap to get the job done!
How To Clean & Disinfect Sponges
I have 10 microfiber sponges that I rotate through. As a result, I am never without a clean kitchen sponge whenever I need one.
Using my kitchen sponges in the ways I’ve mentioned above, I could easily get about 2-3 weeks of kitchen cleaning out of every microfiber kitchen sponge before needing to be washed, disinfected, and then entered back into the rotation in my kitchen. (Remember, these aren’t used on greasy pans or with burnt-on foods. That’s what the Scrub Daddy is for.)
But since I have 10 of these awesome sponges on hand — and you can’t ‘see’ the germs and bacteria that are lurking on sponges — I use the quick 2-minute microwave method to sanitize my microfiber kitchen sponge at least once daily. (Better safe than sorry.)
Then, after about a week, it gets tossed into a lingerie bag and goes into the washing machine with a load of towels using hot water. After that, while it’s still wet, it gets a quick 2-minute zap in the microwave and is left to air dry in the laundry room. Then, it goes back into the rotation with the rest of my kitchen sponges.
Okay, here are the best methods for sanitizing kitchen sponge — ranked in order of effectiveness:
#1 – Put Your Kitchen Sponge In The Microwave

The best advice I’ve found for microwaving kitchen sponges is summarized by TLC: “While most germs can only survive about 30 seconds in the microwave, you’ll need to nuke your kitchen sponge for 2 minutes at full power to 99% of bacteria [like Ecoli] and viruses [like Norovirus]. Before you hit ‘start,’ be sure to saturate your sponge with water, since a dry sponge may catch fire. Look out for a burst of steam when you open the microwave door, and let the sponge cool before you remove it — it will be very hot! You may want to use tongs to pick it up.”
The microwave method kills 99.9% of bacteria from sponges.
#2 – Put Your Kitchen Sponge In The Dishwasher

Simply place the sponge inside the utensil compartment. Load the dishwasher as usual with dishes, silverware, and detergent. Run the dishwasher using the hottest cycle possible. (You could even use the ‘sanitize’ setting, if desired.)
The dishwasher method alone kills 99.9% of bacteria from sponges.
#3 – Soak Your Kitchen Sponge In Bleach

Soak your sponge for at least 5 minutes in a solution of 3/4 cup bleach to 1 gallon of water. Best of all: If you mix the bleach solution in your kitchen sink, then you’ll be cleaning and sanitizing your sink at the same time!
The bleach method alone kills 99.9% of bacteria from sponges.
#4 – Soak Your Kitchen Sponge In Vinegar

This one’s easy… and environmentally friendly! Soak your sponge for at least 5 minutes in full-strength white vinegar — overnight is even better. Then, let the sponge air-dry — in the sun, if possible.
The vinegar method alone kills 99.6% of bacteria from sponges.
What About Tossing Sponges In The Washing Machine?
When I first bought the microfiber sponges, I had planned for the washing machine to be my primary method of cleaning and disinfecting sponges.
The manufacturer’s own cleaning instructions are: hot water, no bleach, no fabric softener, and low-heat dryer.
However, after a little research, I learned that while the washing machine may be good at cleaning microfiber sponges, it’s not very effective at sanitizing sponges. So that’s why I nuke ’em daily, and then machine wash ’em weekly.
The washing machine method alone kills 93% of bacteria from sponges.
In case you’re wondering, here’s what my microfiber sponges are made of:
- Scrubbing Side: 90% Luster Silk + 10% Polyester
- Microfiber Side: 79% Polyester + 21% Polyamide
- Inner Sponge: 100% Polyurethane
According to the manufacturer, they can safely be cleaned in the washing machine or dishwasher.
Facts About Removing Germs From Sponges

Whichever type of kitchen sponge you prefer, always wring it out the best you can after each use. That way, it will dry faster — giving bacteria less opportunity to grow and thrive.
Some interesting facts about bacteria on kitchen sponges:
If you are going to use a dish sponge, replace it every 2 weeks.
~ Source
Nearly 1 in 4 of us (21%) keep sponges until they look dirty or smell bad, while 17% wait until sponges fall apart before throwing them out. Another 18% say they typically keep their kitchen sponges for 3 to 4 weeks, while a few (8%) keep them a month or longer.
~ Source
Dish rags are really no better than sponges. Like sponges, using a dirty dish rag to clean a kitchen countertop will only spread germs. Your best bet is to replace rags about once a week. Allow them to dry out between uses because most bacteria thrive only in moistness. In fact, they can only survive a few hours on dry surfaces. Rags should be washed in the washing machine and then dried on high heat.
~ Source
Humidity also makes a difference; no bacteria or virus can live on dry surfaces with a humidity of less than 10%. Any sort of nutrients — food particles, skin cells, blood, mucus — helps microbes thrive, which is why your kitchen sponge is a breeding ground.
~ Source


