I love to cook, and I do use spices quite frequently.
I’ve watched a few episodes of Tidying Up on Netflix — it’s a trend that has me re-thinking my kitchen organization habits every time I open a cupboard or drawer. If you’re not familiar with the series, Marie Kondo is a renowned tidying expert who tries to help real people declutter their lives… starting in the home.

My kitchen spice cabinet is small — but I really like the location of it. It’s an upper left cupboard in relation to the stove, which makes for an easy reach when preparing food and cooking meals.
The spice cupboard really needed an overhaul though — because I’ve always had to remove almost all of the shelf items whenever I’m looking for something specific. There’s not enough room to slide the contents around to take a peak.
I thought I’d start small and move some of my smaller spice bottles to an under-utilized drawer directly under the counter below (also to the left of the stove).
Initially, I wanted a spice drawer insert. You know, the tiered kind found in custom kitchens that generally cost way too much.
I decided to make my own instead! So today I’ll be showing you how you can make your own spice drawer organizer for a just few dollars.

This DIY project only cost me $4 using paint stir sticks from Home Depot.
Best of all, this spice drawer organizer is super easy to make!
Materials Needed
Here’s a list of the supplies I used to make the spice drawer inserts:
- 4 5-gallon paint stir sticks (3-packs)
- Contact cement
- Miter saw
- Ruler
- Pencil
How To Make This DIY Spice Drawer Organizer
Time needed: 1 hour
These are the steps I used to make each of the inserts for this DIY spice drawer organizer:
- Measure the drawer
I measured the drawer — to determine width, length, and depth. (My drawer has a 3-inch depth with another inch for clearance within the drawer opening.)

- Determine Supplies
I calculated my measurements and found that I would need a total of 12 paint sticks to complete the project.
TIP: First, determine how tall your average spice bottles are. (The goal is to make sure that the lengths of your spice rack tiers are above that, while utilizing the complete length of your drawer.) Then, keep in mind that each paint stick measures approximately 1.5 inches in width and 21 inches in length.
- Determine Rows
I determined that the length of my drawer would allow for 4-tiered inserts. It just so happened that my drawer would fit 7 paint sticks wide perfectly — without having to cut them lengthwise — to have them fit flush widthwise. I decided to make 3 rows with 4-inch tiers (for the majority of my spice bottles) and 1 row with a 5-inch tier (for the taller spice bottles).
The stick sizes I ended up using:
– 21 – 4-inch sticks for the bulk of the 3 regular inserts
– 7 – 5-inch sticks for the taller insert
– 4 – 9.75-inch sticks for the rise of the tiers
TIP: I utilized every piece of the paint stir sticks to minimize waste! Each spice drawer insert includes 7 of the 4- or 5-inch sticks, 1 of the 9.75-inch non-tapered sticks, and 1 of the 9.75-inch tapered sticks. (The 9.75-inch pieces would be for support behind the 7 individual sticks and the rise. These pieces would be hidden — so I could use the parts of the paint sticks that were tapered.)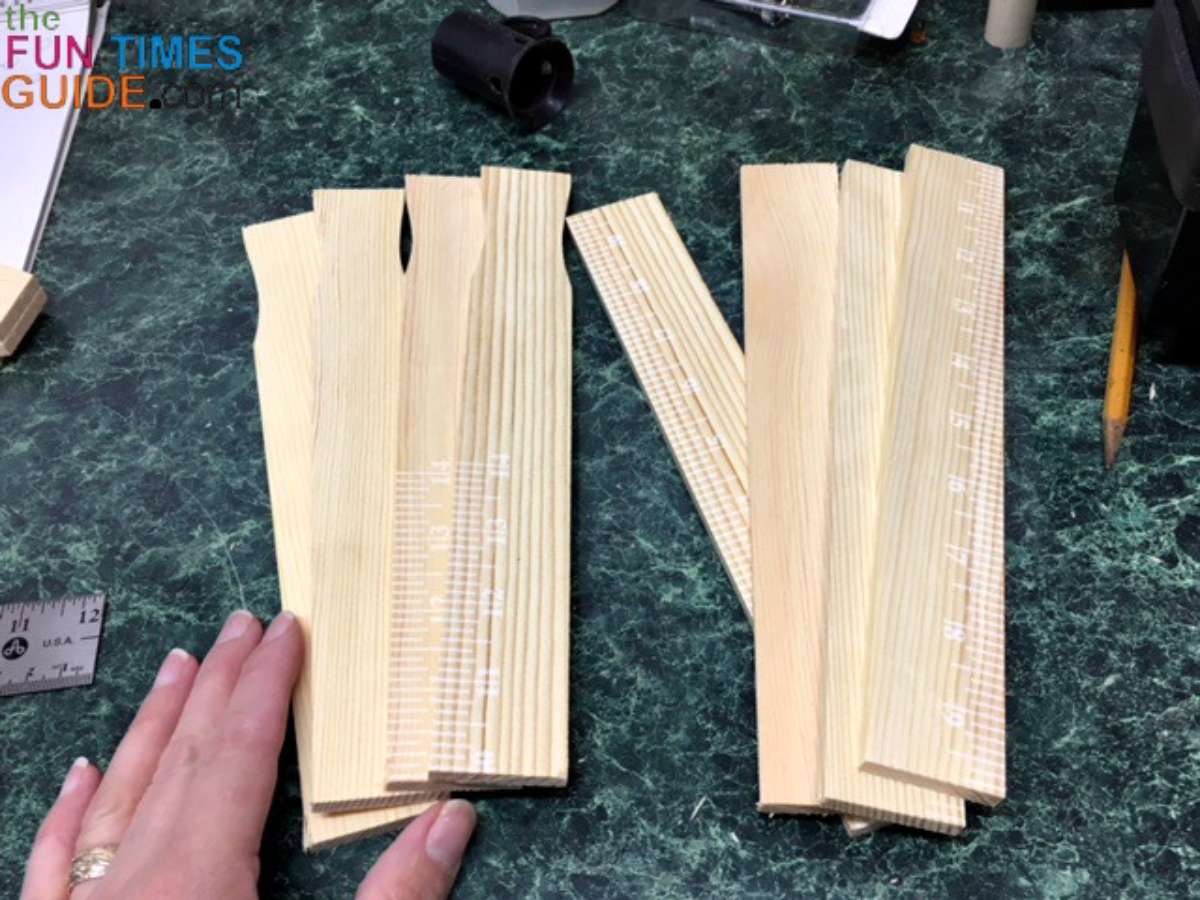
- Measure & Cut
Once I knew exactly how many pieces I needed for this DIY spice drawer organizer, I measured and cut the paint stir sticks using a miter saw.
TIP: I left the paint sticks in their shrink-wrap packaging when possible (when marking the measurements and cutting the sticks). This allowed me to make the least amount of cuts.
- Assemble Sticks
After all of the pieces were cut, it was time for assembly using contact cement (which I call glue). To get the pieces ready for gluing, I lined up 7 of the 4-inch pieces in a row with the ruler markings face up (so they would be hidden when placed in the drawer). Then, I got 1 non-tapered 9.75-inch piece and 1 tapered 9.75-inch piece and set them aside so they’d be ready to use.

- Apply Glue
I applied the glue to one edge of the first 4-inch piece first. Then, I picked up the second piece, applied glue to both edges, and joined the first and second piece together. Then, I repeated the steps through piece 7 (minus adding the glue to other side of the end piece).
TIP: With all the pieces laying flat, I used a straight edge to make sure pieces 1 through 7 were all flush — before I left them to bond securely.
- Glue Tapered Support
I applied glue to the 9.75-inch tapered support piece and along to top portion of all 7 flat pieces. Then, I placed the tapered support stick on top of the glue.

- Add Riser
To complete the first spice drawer insert, I added glue to the edge of the non-tapered 9.75 inch stick (which would be the riser) and a little along the contact point — where it would connect along the tapered support piece.
TIP: To prevent any excess glue on the insert from securing to the cardboard, I slid the assembled spice drawer insert up along the cardboard to weaken that bond. Then, I put the insert aside — so the glue could dry permanently. I repeated this same process for the remainder of the spice drawer inserts.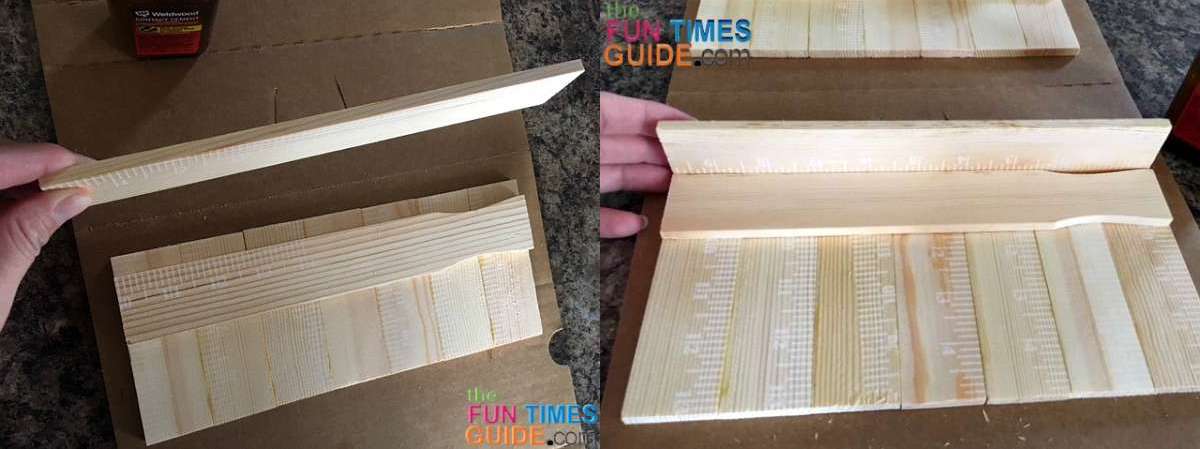
- Add to Drawer
Once all of the inserts had bonded permanently, I added each insert into the drawer.
TIP: They are all individual — but if you measured right, the inserts should fit snugly and not slide around.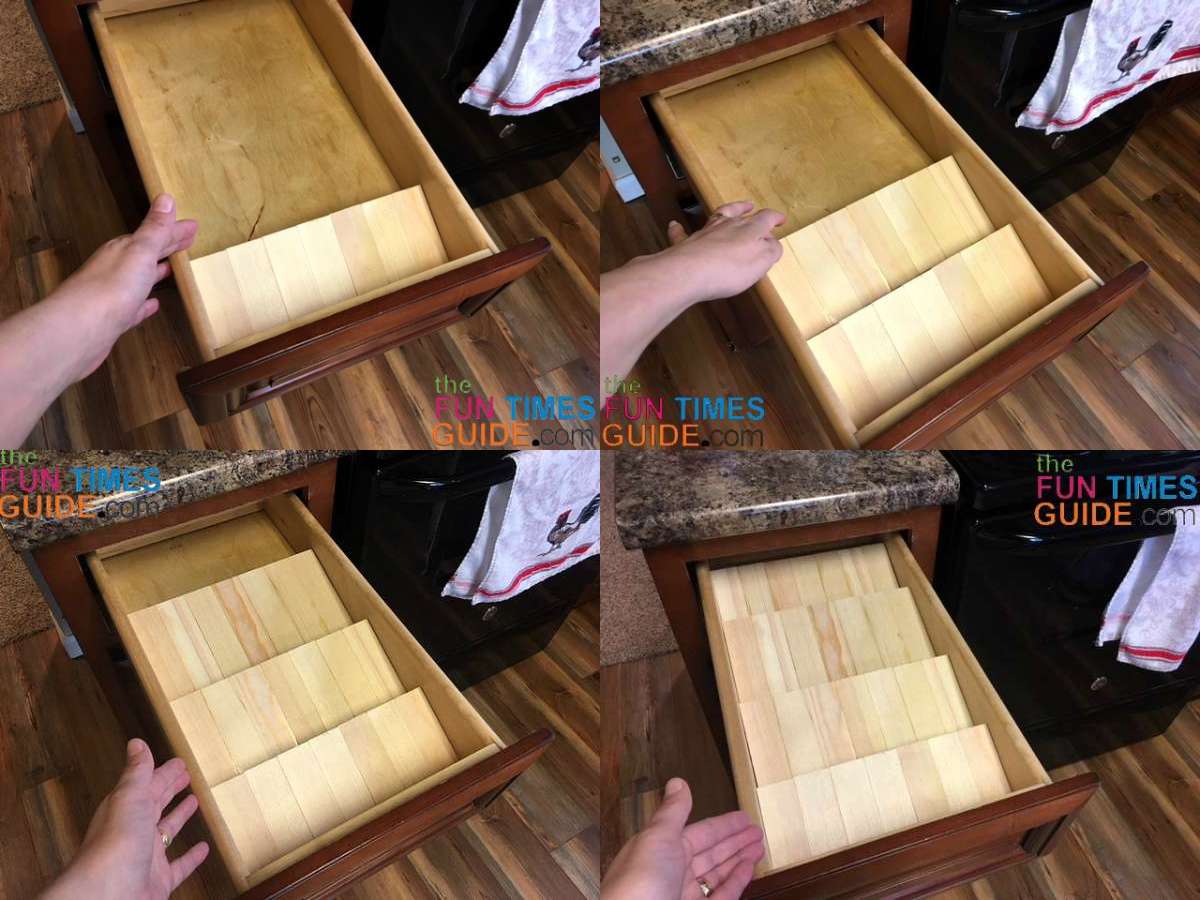


Before I filled the new spice drawer, I went through all of my spices and checked the expiration dates. I was shocked to see how old some of them were! I ended up throwing half of my spices away in this process.
Then, I added the remaining spices to my new spice drawer organizer. (I even had room to place some cake decorating candy in the back row!)
I Gave My Spice Cabinet A Facelift, Too
Since I was on an organizational kick, I proceeded to further organize my spice cabinet…
First, I added a wire step spice rack from the dollar store — for the big spice jars that wouldn’t fit in the spice drawer. And I use the space underneath that wire spice rack for gravy mixes and other packaged items.


Then, since I had up all the extra space in my spice cabinet, I decided to reorganize the baking supplies shelf — so I can more easily find all my baking goods at once (cooking oil, flour, baking soda, cocoa, etc). Although it still looks full, there is actually room to slide things around to easily locate items in the back row.

Finally, I bought a couple of tall oval dry food storage containers from the dollar store — to keep brown sugar, confectioners sugar, flour, etc. and to get rid of the bag. This makes my kitchen look better… and more organized. These containers are also great because they have a snap lid for easy pouring.

Here are before and after photos of my spice cabinet:

The Bottom Line…
Marie Kondo would be so proud of the joy this spice drawer has sparked in me!
If you happen to have a spare drawer in the kitchen, the spice drawer inserts can help you get your spices organized.
And if you think about it… this same idea for DIY drawer inserts could also be used:
- In the bathroom for makeup
- In the workshop for small containers of miscellaneous items
- In any extra drawer to hold vitamins, medication, or whatever you want to get organized!
I hope you enjoyed this DIY spice drawer tutorial and spice cabinet organization tips. Happy organizing!


