Prefer using a DIY organizer rather than buying a product or gadget that does the same thing?
From the ‘Now why didn’t I think of that?’ file…
The following DIY organization ideas stem from a TV segment I saw featuring Carley Roney, editor of The Nest.
These are some of the best ideas I’ve seen for getting organized without spending a dime!

Get Organized… For FREE
One of the best ways to get organized for FREE is to repurpose items you already have around the house, and use them in a way that they weren’t originally designed for!
With that in mind, here are some of the DIY storage organizers and tips I learned from watching Carley Roney, editor of The Nest on Live with Kelly and Michael — plus my $.02 on those ideas and some DIY ideas of my own.
If you click on the links, you’ll find clever DIY tips!
#1 – Use old magazines to keep tall boots from falling over in your closet. Simply place a rolled up magazine inside each boot and they will stand tall on their own.
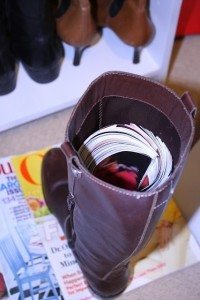
MY TIP: This is a really simple way to recycle old magazines. Bonus Tip – You could also use pants hangers to hang your boots.
#2 – Use old cardboard boxes to organize all sorts of stuff on closet shelves, on the floor, etc. To make ugly, boring boxes look really nice… you can make your own colorful bins by wrapping the old boxes with fun paper (like wrapping paper or sticky contact paper).

via bfranklincrafts
MY TIP: You could also use fabric, shelf paper, leftover scrapbook paper… whatever you have on hand for this DIY organizer idea!
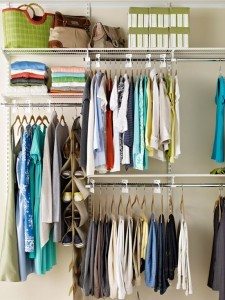
#3 – Make your own shelf dividers using boxes and/or DIY spacers from random things you have around the house. To start with, try making your own DIY organizer to utilize that top-most shelf in your closet!
via bgh
MY TIP: This is especially great for walk-in closets with wire shelving units, like mine. There’s an entire wall-to-wall wire shelf that’s completely empty above the area where the hangers hang. Bonus Tip – I also love these related DIY organization ideas using luggage tags as labels and using old name badges with clips as labels.
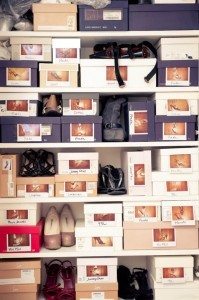
#4 – Keep shoes in their original boxes and you’ll eliminate the need for shoe organizers altogether! Simply take a photo of the shoes, tape it to the front of the box, and you’ll always be able to find the pair of shoes you want in a heartbeat. You don’t even need to go hunting for additional items to use this DIY organizer idea!
via everythingfab
MY TIP: Another FREE DIY organizer idea for your shoes is to repurpose a piece of furniture that you already have — like a closet-type hutch or bookshelf or a low-profile shelf unit.
#5 – Use a straw to keep necklaces from getting tangled.

via realsimple
MY TIP: This is a great thing to do with your jewelry when you’re traveling! Bonus Tip – Here’s a travel necklace saver that you could easily DIY rather than buying.
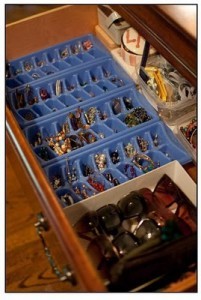
#6 – Use ice cube trays to organize your earrings, pins, and rings. Simply place the items inside the individual ice cube sections. Ice cube trays also stack nicely together one on top of the other!
via beadup
MY TIP: It would be fun to spray paint the ice cube trays in fun colors first to match your room decor. Personally, I would also line the bottom of each ice cube compartment with a piece of felt or a very small piece of that white cotton batting you find inside the box when you buy jewelry at a store. Bonus Tip – I also use pill organizers as travel jewelry boxes and to hold charms, clasps, and other tiny jewelry pieces that I don’t want to lose.
#7 – Use leftover holiday ribbon to bundle a complete set of sheets together for the guest bedroom. Then, you’ll never have to scramble to find a set of sheets again!
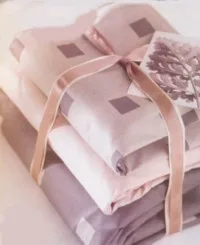
via yelp
MY TIP: You can do the same thing for guest towels in the bathroom, as well. Bonus Tip – Along these same lines, I also like Martha Stewart’s tip for storing bed sheets. (Although my sheet sets never fold quite so neatly or pack quite so thinly — even when I use these sheet folding instructions.)
#8 – Use an old corkboard and pushpins to create a ‘buttons & baggies station’ to store all of those tiny little bags of buttons and dyed-to-match thread that you get whenever you buy a new garment. This way, they’re all visible and it’s easy to find the one you need when you need it.
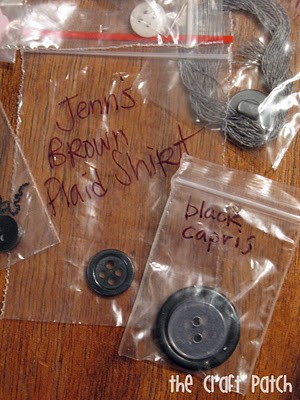
via thecraftpatch
MY TIP: This DIY organizer would look cute hanging on the wall in your laundry room — especially if you jazz up the corkboard this way! Bonus Tip – It would also be handy if the corkboard is on the inside a cabinet door in a laundry room, kitchen, etc.
#9 – Use a leftover cardboard 6-pack holder (divided cardboard carrier with handle) to create a handy condiment station. Inside it, keep all of those things you typically only use whenever eating hamburgers or hot dogs. Simply wrap an old 6-pack carrier with contact paper, and tuck it away in the back of your refrigerator for those days when you need it. This saves a lot of valuable space on your refrigerator door that can be now be used for the things that you use more frequently!
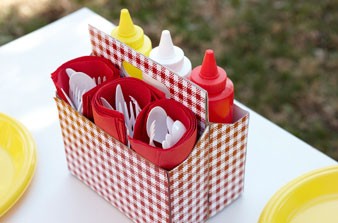
via foodnetwork
MY TIP: This is great for picnics and parties — makes it easy to carry 6 condiments (mustard, ketchup, pickles, radish, etc) at once to the party location.
#10 – Use old votive holders that no longer have candles in them as drawer organizers. This is a great way to organize a junk drawer by giving you lots of small, confined spaces in which to store tiny trinkets inside a drawer. You could use shot glasses, as well.

via creative1dollar
MY TIP: You could also use ice cube trays, pill organizers, or disposable plastic food containers. I’ve used some of the smaller Lock & Lock containers inside my drawers (and in our toolbox) to organize screws, nails, pins, pens, and miscellaneous bits & pieces. I use disposable plastic food containers, too.
#11 – Use leftover nail polish to color code keys that you use most often (front door, back door, gym locker, work office, etc). Works especially well with bright nail polish colors!
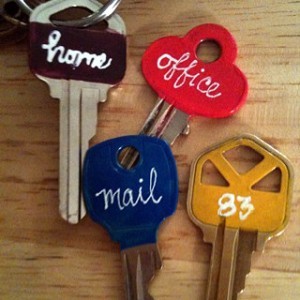
via pinterest
MY TIP: Since we enter through our automatic garage door 99% of the time, I rarely carry anything other than the 2 keys to the cars that we own. They’re easily identifiable by their unique shapes alone. So my tip is for making it easy to grab & go the house key on those times when you need it (going for a walk, giving the pet sitter or house guests a key, etc). Simply clip a single house key onto the end of a lanyard that you’ve received from some event or that came attached to an item you’ve purchased. The long, looped cord makes it easy to hang around your neck or from the rearview mirror of the pet sitter’s car!
#12 – Use leftover toilet paper rolls to eliminate the clutter when storing cords and cables for all of your electronics. Simply store them neatly folded inside a toilet paper roll. That sturdy piece of cardboard makes a great binder for bunches of wires and cords.

via lifehacker
MY TIP: You could also use paper towel rolls. Bonus Tip – The cardboard rolls can be used to keep cords at bay while you’re using electronics that are plugged in, as well.
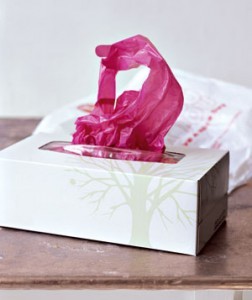
#13 – Use an old tissue box to store plastic bags that you get from department stores and grocery stores. That way, it’s easy to grab a bag on the fly!
via realsimple
MY TIP: I’ve found that the more bags you fit inside the box, the harder it is to pull one out each time. So instead… recycle the majority of your plastic bags by taking them to recycle bins found inside stores. Then, neatly fold a smaller number of bags this way inside the tissue box. When your supply gets low, add a few more to the tissue box.
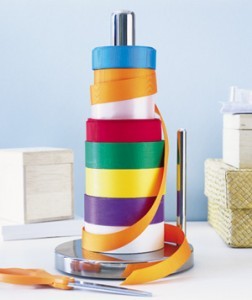
#14 – Use an old paper towel holder to store spindles of holiday ribbon on. Simply slide the rolls of ribbon over the vertical pole. This will give a new home to about a dozen or so rolls of ribbon — depending on thickness.
via realsimple
MY TIP: If you don’t have a spare paper towel holder, then make one. Personally, I like using an old shoebox to store ribbons. Here are even more fun ideas for storing ribbon.
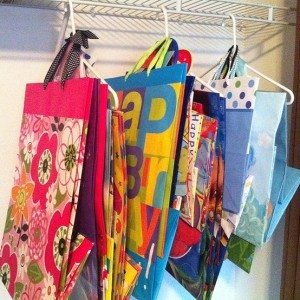
#15 – Use hangers that have skirt/pant clips on them to store holiday gift bags, folded sheets of wrapping paper, and tissue paper. (Or use trouser pants hangers with multiple bars on one hanger.) Hang your bags & paper right from those clips or over the center bar and store in the back of a closet. Or, simply drape the handles of the bags right over the neck of the hanger itself.
via pinterest
MY TIP: You can also do this with all of the shopping bags you’ve been saving. I’ve been saving ’em for years, because you never know when you’re going to need a sturdy — disposable — tote. Bonus Tip – You can use pants hangers without clips too, and even plain ‘ol regular hangers!
If you found these DIY storage & organization tips helpful, it would mean the world to me if you would share with others on Pinterest:


